

There’s something about risotto Gluten Free that always feels like a warm hug in a bowl.
I remember the first time my mom taught me how to stir it patiently over the stove—it was a quiet afternoon in our country kitchen, and the smell of sautéed onions and broth filled the house.
Now I make this creamy gluten-free version for my daughters, and it’s become one of our favorite cozy meals.
Why You’ll Love This Risotto Gluten Free Recipe
- Naturally Gluten-Free: Arborio rice is inherently gluten-free, so no special ingredients needed! Perfect for families with dietary needs or anyone wanting a delicious GF meal.
- Incredibly Creamy & Comforting: That slow cooking process creates a luxurious texture that’s pure comfort food gold.
- Surprisingly Simple: Don’t let risotto intimidate you! It just needs a little patience and stirring – a perfect excuse to slow down for 20 minutes.
- Family-Approved: From my little girls to my mom, everyone in our house devours this. It’s mild enough for kids but sophisticated enough for adults.
- Versatile Base: Delicious on its own, or feel free to add your favorite veggies or protein (more ideas below!).
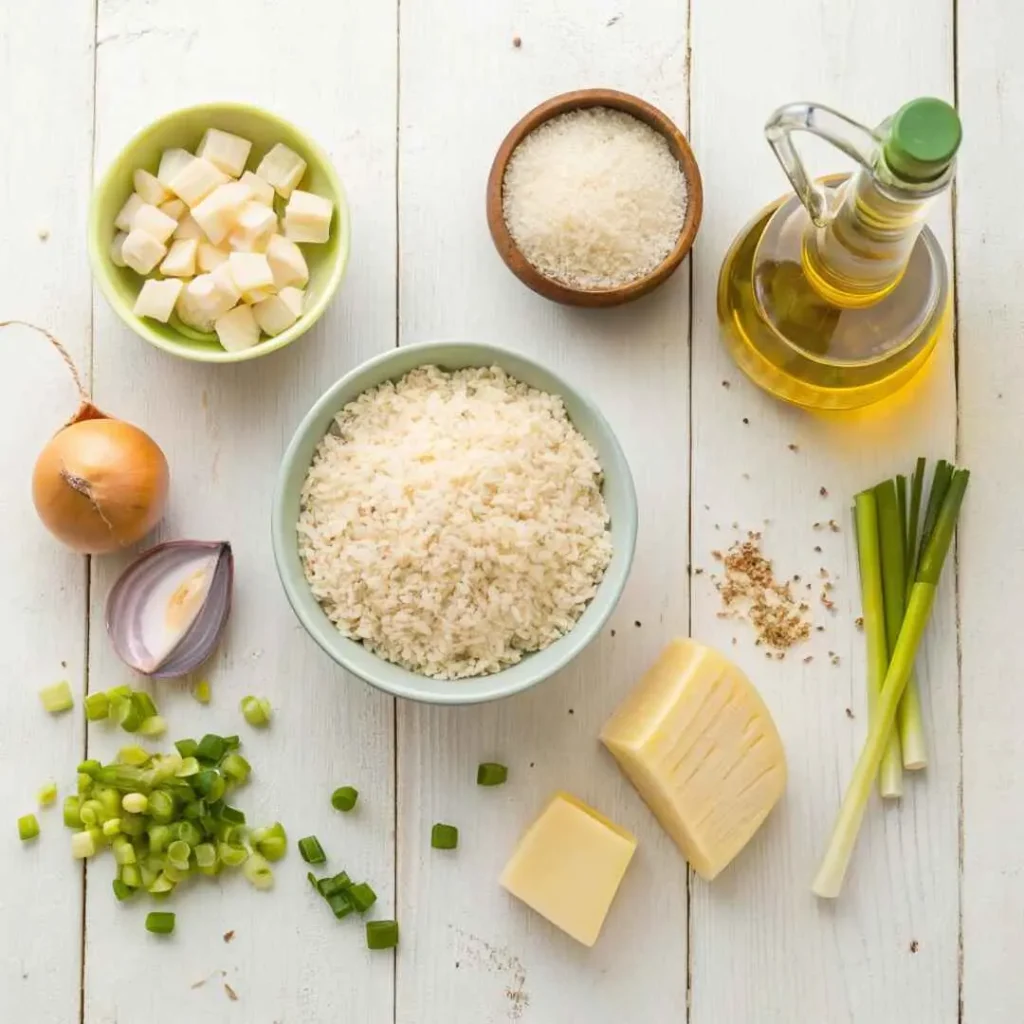
Ingredients You’ll Need
Here’s what you need to gather. It looks simple, but magic happens when these come together!
- 4-6 cups chicken broth (or vegetable broth for a vegetarian option)
- 3 tablespoons extra virgin olive oil
- 1/2 cup chopped white onion
- 1 cup chopped leeks (white and light green parts only – see tips!)
- 2 cups Arborio rice
- 2 tablespoons salted butter
- 1/3 cup freshly grated Parmesan cheese (plus more for serving, always!)
- Salt and freshly ground black pepper to taste
- Optional: Fresh parsley, chopped, for garnish
Let’s Make Some Creamy Risotto Gluten Free!
Alright, take a deep breath and let’s get stirring. It’s easier than you think!

- Warm the Broth: Pour your chicken broth into a small saucepan and heat it over medium heat. Once it’s warm, turn the heat down to low just to keep it simmering gently. Having warm broth is key!
- Sauté the Aromatics: In a separate large saucepan or Dutch oven (I love my Dutch oven for this!), heat the olive oil over medium-high heat. Add the chopped onions and cook, stirring occasionally, until they soften and smell amazing, about 4 minutes.
- Add the Leeks: Stir in the chopped leeks. Cook for another 5-6 minutes, stirring now and then, until they soften and maybe get a tiny bit golden. Your kitchen should be smelling wonderful right about now!
- Toast the Rice: Add the Arborio rice to the pot. Stir it well to coat every grain with the flavorful oil. Cook for 1-2 minutes, stirring constantly, until the edges of the rice look a little translucent. This toasting step adds great flavor.
- The Stirring Begins: Reduce the heat to medium or medium-low to maintain a gentle simmer once the broth is added. Now for the calming part! Add about ½ cup of the warm broth to the rice – just enough to barely cover it. Stir pretty often, letting the rice absorb the liquid. You’ll know it’s time for more broth when you can briefly see the bottom of the pan as you stir.
- Keep Adding Broth: Continue adding the warm broth, about ½ cup at a time, stirring frequently and letting it absorb before adding the next ladleful. This gradual process is what makes risotto creamy! Taste the rice as you go. After about 20 minutes (give or take), it should be creamy but still have a slight bite (al dente). Don’t overcook it into mush! If you run low on broth, just warm up a bit more. Patience is your friend here – enjoy the process!
- Finish with Flavor: Once the risotto reaches that perfect creamy, al dente texture, remove it from the heat. Stir in the salted butter and the grated Parmesan cheese until melted and luscious.
- Season and Serve: Give it a taste. Add salt and pepper as needed (start with about ¼ tsp salt and go from there). Serve immediately in warm bowls, topped with extra Parmesan cheese (don’t be shy!) and a sprinkle of fresh parsley if you like.
Tips & Variations from My Kitchen
- Cleaning Leeks: Leeks can be sandy! The easiest way I find is to slice them first, then put the chopped pieces in a big bowl of cold water. Swish them around, let the dirt sink, and then scoop the clean leeks out from the top. Make sure you’re mostly using the white and light green parts; the dark green tops can be tough.
- The Stirring Secret: You don’t need to stir constantly, but definitely frequently! This helps release the starch from the rice, which creates that signature creaminess. Don’t walk away for too long!
- Flavor Boost: Since we’re omitting the wine, ensure your broth is flavorful! You could also add a tiny squeeze of lemon juice right at the end (after stirring in the butter and cheese) for a little brightness, if you like.
- Make it Your Own: This is a fabulous base. Try adding sautéed mushrooms, cooked peas, asparagus (added in the last few minutes of cooking), or even some cooked shrimp or chicken towards the end.
- Broth Check: Taste your broth beforehand. If it’s quite salty, you might need less added salt at the end.
Quick FAQs
- Is Arborio rice really gluten-free?
Yes! Arborio rice, like all plain rice varieties, is naturally gluten-free. It’s the type of rice that gives risotto its classic creamy texture. - Can I make this risotto ahead of time?
Risotto is truly best enjoyed fresh and creamy right after cooking. Leftovers tend to stiffen up in the fridge. However, you can reheat it! See the storage tips below for the best methods. - Help! My risotto isn’t creamy.
This usually happens if the heat is too high (cooking the liquid off too fast) or if you add the broth too quickly. Keep it at a gentle simmer and add broth gradually, stirring often to release those starches!
Final Thoughts from My Heart (and Kitchen!)
There’s something so satisfying about creating a beautiful dish like this from simple ingredients. It’s a little bit of kitchen magic, perfect for slowing down and connecting – whether you’re cooking alongside someone you love, like I often do with my mom, or just enjoying a quiet moment stirring at the stove.
I truly hope you give this Creamy Gluten-Free Risotto a try. Picture a cozy evening, a warm bowlful, maybe some crusty bread on the side… pure bliss!
If you make it, please let me know how it turned out in the comments below! I love hearing about your own kitchen adventures and any twists you add. Feel free to share this recipe with friends and family too!
Storage Tips :
Gluten-free risotto is best fresh! Leftovers can get thick. Store in an airtight container in the fridge for up to 4-5 days.
To Reheat (Stovetop – Recommended!): Warm 2-3 tablespoons of broth per cup of leftover risotto in a saucepan over medium heat. Add the risotto and stir constantly over low heat. Add more broth as needed until it’s creamy and heated through. Taste and re-season if necessary.
To Reheat (Microwave): Place risotto in a microwave-safe bowl. Heat for 1-3 minutes until hot. Stir in 1-2 tablespoons of milk, cream, or broth to loosen it up and restore creaminess.

For another dinner idea, explore this Pizza Rustica : 3 Classic Family Recipes From Naples.
Print
Creamy Risotto Gluten Free
- Total Time: 35 minutes
- Yield: 4 servings 1x
- Diet: Gluten Free
Description
Learn how to make delicious risotto gluten free with our simple and easy recipe. Enjoy the creamy texture without the gluten!
Ingredients
- 4–6 cups chicken broth (or vegetable broth for a vegetarian option)
- 3 tablespoons extra virgin olive oil
- 1/2 cup chopped white onion
- 1 cup chopped leeks (white and light green parts only – see tips!)
- 2 cups Arborio rice
- 2 tablespoons salted butter
- 1/3 cup freshly grated Parmesan cheese (plus more for serving, always!)
- Salt and freshly ground black pepper to taste
- Optional: Fresh parsley, chopped, for garnish
Instructions
- Warm the Broth: Pour your chicken broth into a small saucepan and heat it over medium heat. Once it’s warm, turn the heat down to low just to keep it simmering gently. Having warm broth is key!
- Sauté the Aromatics: In a separate large saucepan or Dutch oven (I love my Dutch oven for this!), heat the olive oil over medium-high heat. Add the chopped onions and cook, stirring occasionally, until they soften and smell amazing, about 4 minutes.
- Add the Leeks: Stir in the chopped leeks. Cook for another 5-6 minutes, stirring now and then, until they soften and maybe get a tiny bit golden. Your kitchen should be smelling wonderful right about now!
- Toast the Rice: Add the Arborio rice to the pot. Stir it well to coat every grain with the flavorful oil. Cook for 1-2 minutes, stirring constantly, until the edges of the rice look a little translucent. This toasting step adds great flavor.
- The Stirring Begins: Reduce the heat to medium or medium-low to maintain a gentle simmer once the broth is added. Now for the calming part! Add about ½ cup of the warm broth to the rice – just enough to barely cover it. Stir pretty often, letting the rice absorb the liquid. You’ll know it’s time for more broth when you can briefly see the bottom of the pan as you stir.
- Keep Adding Broth: Continue adding the warm broth, about ½ cup at a time, stirring frequently and letting it absorb before adding the next ladleful. This gradual process is what makes risotto creamy! Taste the rice as you go. After about 20 minutes (give or take), it should be creamy but still have a slight bite (al dente). Don’t overcook it into mush! If you run low on broth, just warm up a bit more. Patience is your friend here – enjoy the process!
- Finish with Flavor: Once the risotto reaches that perfect creamy, al dente texture, remove it from the heat. Stir in the salted butter and the grated Parmesan cheese until melted and luscious.
- Season and Serve: Give it a taste. Add salt and pepper as needed (start with about ¼ tsp salt and go from there). Serve immediately in warm bowls, topped with extra Parmesan cheese (don’t be shy!) and a sprinkle of fresh parsley if you like.
Notes
Gluten-free risotto is best fresh! Leftovers can get thick. Store in an airtight container in the fridge for up to 4-5 days.
- Prep Time: 10 minutes
- Cook Time: 25 minutes
- Category: Dinner
- Method: Stovetop
- Cuisine: Italian
Nutrition
- Serving Size: 1 bowl (~1 cup cooked)
- Calories: 320 kcal
- Sugar: 2g
- Sodium: 580mg
- Fat: 13g
- Saturated Fat: 5g
- Unsaturated Fat: 7g
- Trans Fat: 0g
- Carbohydrates: 40g
- Fiber: 2g
- Protein: 8g
- Cholesterol: 20mg
Keywords: risotto, gluten-free, creamy rice, Italian comfort food, Arborio rice, easy risotto